One of the most challenging tasks for a do-it-yourself self-publisher is laying out a dust jacket for a hardcover book.
To create the artwork for a jacket, it’s important to work closely with your book printer. Many of the crucial pieces of information you’ll need are only available from the people who will manufacture your book.
For instance, the width of the spine is determined by the bulking of the specific paper used for printing your book. This is expressed as pages-per-inch. A typical book paper is 400 pages per inch. This paper would create a spine width of 1.0″ for a 400 page book. But a dust jacket needs to take into account the thickness of the boards that make up the case, and the rounded corners of the case.
Because the cases of hardcover books extend past the edges of the paper, a 6″ x 9″ book will need a jacket that’s approximately 9.25″ high. Why do I say approximately?
Every Printer Has Their Day
You cannot determine the measurements for your jacket without your printer, as I said. Even with precise measurements, each printer has their own favorite paper stock, their own bindery equipment, their own cloth or paper covers for cases. All these elements contribute to slight variations from printer to printer.
Some printers will supply you with a template from which you can build the document that will become your book jacket. Some will only give you dimensions, or formulas.
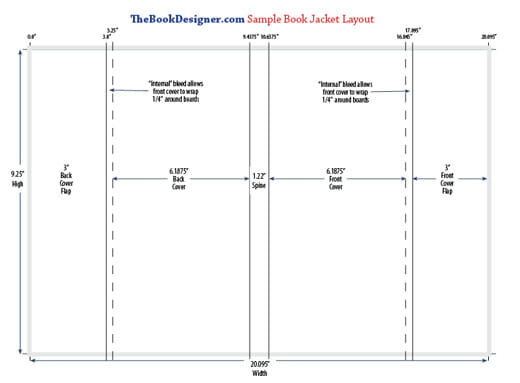
That’s why I’ve created this sample template:

This sample template shows the layout for a typical 6″ x 9″ dust jacket. The actual flat dimensions of this jacket are 9.25″ x 20.095″ which will allow for 3″ flaps.
Using this template, you can see how the dimensions your printer gives you will help create your own jacket artwork.
For instance, this printer requires .25″ added to the trim size of the height of the book and the standard .25″ for the “turn” around the edge of the front and back covers. This layout is for a 408 page book on 400 pages-per-inch paper stock, so you can see the binder has added about .22″ to accommodate the other pieces of the spine, yielding a spine width of 1.22″
The allowance for “turn,”—or “internal” bleed—is important because if you have an illustration that covers the entire front cover, you want it to wrap around that front edge so you don’t have a stripe of an unwanted color creeping over onto the cover from the front flap.
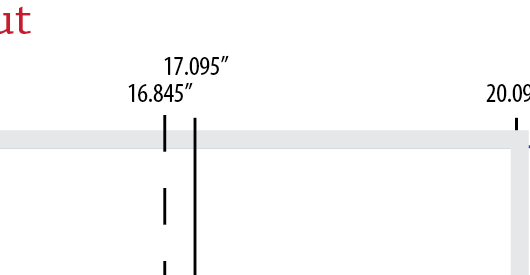
You’ll also note at the top of the diagram “ruler stops.” I always calculate these measurements and use them to create guides for my jackets. It helps me visualize the various elements of the jacket and verify that the measurements are correct. For instance, on my sample, if all the horizontal measurements don’t add up to 20.095″ I know I’ve made a mistake somewhere.
Pieces and Wholes
Normally in the development of the book design, the front cover is designed separately, and well before the rest of the jacket. All the parts can be done in pieces and then assembled on the master template.
I’ve put a link below so you can download a PDF of this layout. The PDF is an actual-size document so you can see exactly how it’s constructed.
Whether you want to do your own dust jacket or not, if pays to know how they are put together. And if you have any questions about how this works, leave them in the comments and I’ll try to help out.
Download: TheBookDesigner.com Sample Book Jacket Layout
Ready to Design Your Book Cover?
Want To Make Sure Your Book Cover Design is C.L.E.A.R.?
So often we see sub-par book covers paired with amazing books… Which is why we pulled this excerpt from our self-publishing course to help you get clarity on what makes a great cover, and how to outsource the design (if you’re not an illustrator yourself).


